Create Bot Yourself

Deploying...
Sit back and relax while we compile and deploy your code!
Create Google Assistant Bot

 WhatsApp
for Business
WhatsApp
for Business
You are required to create and then set up your WhatsApp business account in the Facebook Business Manager to do this, please see Create a WhatsApp Business Account.
The phone number that you intend to use with WhatsApp must be clean, that is, with no previous registration or affiliation with WhatsApp.For more detailed information on picking and registering a phone number, see the Phone Number guide.
Once you have your phone number, follow Set up a Phone Number for your WhatsApp Business Account guide.
The application is based on Docker. You can follow either of the two Facebook proposed approaches => On-premise or Amazon Web Services (AWS) to setup your environment.
Make a note of your unique Docker URL, username and password as this is to be submitted to us for mapping your WhatsApp business phone number with the Gupshup bot.
Note: If you need help setting up a docker or want us to setup a bot for your WhatsApp Business, kindly reach us at devsupport@gupshup.io
 Slack
Slack
-
Sign in to your Slack workspace by clicking here.

-
Go to the Slack API website and click on Your Apps in the top right corner.
-
Click on 'Create an App' button.

-
Select the From scratch option.

-
Enter the App Name and select a workspace from the drop-down menu.
-
Click the Create App button.

- Go to App Home under Features section in the sidebar.
- Scroll down to the Show Tabs section and switch on the Messages Tab toggle.
- Enable the tick box against Allow users to send Slash commands and messages from the messages tab.

- Go to OAuth & Permissions under Features section in the sidebar.
- Scroll down to the Redirect URLs section and click the Add New Redirect URL button.
- Enter the Redirect URL copied from the Gupshup website there and click the Add button.

To enable events:
- Go to Event Subscriptions under Features section in the sidebar.
- Click on the Enable Events toggle.
- A Request URL section will appear. Enter the request URL copied earlier from the Enabling events section on the Gupshup website.
-
You will be asked to place the Request URL, copy and paste the URL as seen below

To subscribe to events:
- Go to Event Subscriptions under Features section in the sidebar.
- Scroll down and click Subscribe to bot events.
- Click on the Add Bot User Event button.

- Find and add all the mandatory events mentioned below -
- message.channels
- message.groups
- message.mpim
- message.im
- channel_created
- file_change
- file_created
- file_public
- file_shared
- Link_Shared
- im_open
- im_created
- Click on the Save Changes button.
- Go to Interactivity & Shortcuts under Features section in the sidebar.
- Switch on the Interactivity toggle.
- A Request URL section will appear. Enter the request URL copied earlier from the Enable Interactive Components section on the Gupshup website.
- Click on the Save Changes button.

- Go to Basic Information under Settings section in the sidebar.
- Scroll down and find the App Credentials section.
- Copy the credentials shown there to be submitted to Gupshup later.

Important:For existing users, Please ensure that your Slack app is reviewed and approved with the latest changes before proceeding.
Using 'Welcome Message' parameter you can set the introduction message for your bot

Note: You will have to pass the entire HTML page containing your custom CSS, here is a sample code
	<html>
		<head>
			<meta>
			<title> --- Web browser title --- </title>
			<link --- Setting favicon --- >
			<style> --- Your custom CSS goes here --- </style>
		</head>
	 	<body> --- Your custom HTML goes here --- </body>
	</html>
 Twitter
-
To create an app log on to https://developer.twitter.com/en/apps and click on “Create New App” button to proceed
 If you are creating the app on behalf of your company, it is recommended you create the app with a corporate Twitter account.
-
Fill in the details as applicable and then click “Create your twitter application”

On the App dashboard - goto "Permissions" tab and enable "Read, Write and Access direct messages” then click on "Update Settings"

Go to "Keys and Access Tokens" tab. You will get the “Consumer Key (API Key)”, “Consumer Secret (API Secret)” under “Consumer API keys”. Also below that you will get “Access token” and “Access token secret”

Follow this Twitter doc to apply for relevant Account Activity API access. You may either apply for Premium or Enterprise access. To know more about Account Activity API refer this Twitter doc

Applying for a developer account is must, as it is required to set up your access to the Sandbox or Paid Premium Account Activity API.
Once you have a developer account:
- Go to the Dev Environments page.
- Click 'Set up dev environment,' name your environment, and specify a Twitter app ID for the environment. The environment name you chose will be your Dev environment label.
Go to the Privacy and safety section of your account and tick the "Receive Direct Messages from anyone" from the bottom of the page and then save the changes.

 Telegram

 Facebook
To create a new Page, visit https://www.facebook.com/pages/create
Note: The page profile pic and name will be used to form the "identity" of your bot and it is what people will see when they engage.
To create a Facebook App:
You will need a developer account to create new apps. You can create a new developer account by going to Facebook for Developers and clicking the 'Get Started' button.
To add Messenger platform in your App, follow the below steps:
- In the sidebar of your app settings under 'PRODUCTS', click '+ Add Product'.
- Hover over 'Messenger' to display options.
- Click the 'Set Up' button.

Once Messenger Platform is added to your app - the Messenger settings console will be displayed
To configure webhook follow below steps:
- In the 'Webhooks' section of the Messenger settings console, click the 'Setup Webhooks' button.
- Under callback URL and Verify Token field paste the link and token given below
- Select messages,messaging_postbacks,messaging_optins, message_deliveries, messaging_referrals these are mandatory fields whereas other fields are optional under Subscription Fields
- Click the 'Verify and Save' button

To get page access token
- In the 'Token Generation' section of the Messenger settings console, click the 'Select a Page' dropdown and select the Facebook Page you want to subscribe this app to.
- Copy the token that appears in the 'Page Access Token' field. You will use this token later to submit on our platform

-
NOTE
The “Page ID” can be found in the 'About' section of the page.
-
The Persistent menu - should contain top-level actions that users can enact at any point. To configure one for your bot refer to our persistent menu guide
To see a Sample JSON for Persistent Menu refer to persistent menu guide
- Sample JSON for Persistent Menu:
{
  "disableinput" : false,
  "menu": [
    {
      "title": "Coffee",
      "type": "nested",
      "menu": [
        {
          "title": "Cold",
         "type": "nested",
          "menu": [
            {
              "title": "Chocolate Mocha",
              "type": "text"
            },{
              "title": "Java Chip",
              "type": "text"
            }
          ]
        },
        {
          "title": "Hot",
          "type": "nested",
          "menu": [
          {
              "title": "Cappuccino",
              "type": "text"
            },
            {
              "title": "Caffe Latte",
              "type": "text"
            }
          ]
        },
        {
         "title": "Expresso",
         "type": "text",
        }
      ]
    },
    {
      "title": "View website",
      "type": "url",
      "url": "https://www.gupshup.io/developer/home",
      "webview_height_ratio": "full"
    }
  ]
}
Greeting Message - this message(160 character maximum) will be displayed along with the ‘Get Started’ button. The user needs to see a brief description/ function of the bot before starting a conversation. Please see here for more clarity.
 Instagram
On Instagram, you can convert your personal profile to a business account to access features that can help you grow your business.
To do so, please follow the steps below -
- Go to your Instagram Business(Professional) profile page.
- Tap the menu option in the upper right corner.
- Select "Settings" > "Privacy" > "Messages"
- Under "Connected Tools", toggle on the "Allow Access to Messages" option.
You can use the below link for the steps - https://www.facebook.com/help/instagram/791161338412168
Refer to article: Add a Facebook Page to your Instagram Business Account that explains how to connect to a Facebook Page to an Instagram Professional account.
Create a new Facebook developer App. Once you have completed the app creation flow your app will be loaded in the App Dashboard.
While creating app select Business type
To add Messenger in your App, follow the below steps:
- In the sidebar of your app settings under 'PRODUCTS', click '+’ to add a Product.
- Hover over 'Messenger' to display options.
- Click the 'Set Up' button.

To configure webhook follow below steps:
- In the 'Webhooks' section of the Messenger’s Instagram Settings, click the 'Add a Callback URL' button.
- Under callback URL and Verify Token field, paste the link and token given below
- Click the 'Verify and Save' button.

To subscribe to events follow below steps:
- In the 'Webhooks' section of the Messenger's Instagram Settings, click the 'Edit Subscriptions' button.
- Select all the events (messages, messaging_postbacks, messaging_seen, messaging_handover, message_reactions, standby) and click 'Save'

To get page access token:
- In the 'Access Tokens’ section of the Messenger’s Instagram Settings, click the 'Add or Remove Pages' button and select the Facebook Page you want to subscribe to this app.
- Copy the token that appears in the 'Page Access Token' field. You will use this token later to submit on our platform.

NOTE: The 'Page ID' can be found in the 'About' section of the page.
Instagram


 Google Business Messages
 Workplace
Go to the Workplace website and login to your account.

Go to Admin Panel (wrench and screwdriver icon).
Select Integrations.

Scroll down and click the Create Custom Integration button.
Enter the name and description and click the Create button.

You are redirected to the Integration details page.
Go to Details in the sidebar.
Click the Create Access Token button in the integration Details section.
Copy the new token created for later use.

Go to Permissions in the sidebar.
Enable the permissions mentioned below.
- Message any member
- Read all messages
- Read and action reported content
- Read group content
- Read Knowledge Library content
- Read user email
- Read user timeline
- Read org chart
- Read work profile
- Read group membership
Click Save.

Go to Webhooks in the sidebar on the Integration details page.
Click the pencil icon against Page.

Enter the Callback URL and Verify Token given below in the respective fields.
Select all event checkboxes given below and click Save.

Go to Home (Workplace logo icon).
Go to the Bots section in the Home sidebar.
Select the custom integration you created for the bot.
Copy the ID given the end of the URL in the search bar of your browser for later use.

Sample JSON:
{
"disableinput" : false,
"menu": [
{
"title": "Coffee",
"type": "nested",
"menu": [
{
	"title": "Cold",
	"type": "nested",
	"menu": [
	{
		"title": "Chocolate Mocha",
		"type": "text"
	},{
		"title": "Java Chip",
		"type": "text"
	}
	]
},
{
	"title": "Hot",
	"type": "nested",
	"menu": [
	{
		"title": "Cappuccino",
		"type": "text"
	},
	{
		"title": "Caffe Latte",
		"type": "text"
	}
	]
},
{
	"title": "Expresso",
	"type": "text",
}
]
},
{
"title": "View website",
"type": "url",
"url": "https://www.gupshup.io/developer/home",
"webview_height_ratio": "full"
}
]
}
Note:
To configure a persistent menu for your bot, refer to Gupshup's persistent menu guide.
 Hipchat


 Kik
Kik
Login URL: https://dev.kik.com
Create an account by scanning the Kik Code (using the Kik app) on your mobile.

 Twilio

Open Phone Number settings for the selected phone number -> Configure -> Messaging -> Configure with webhooks

Twilio
IP Messaging
Under Programmable chat select service from navigation bar and click ‘Create a new Chat Service’

A dialog box pop up asking to set a friendly name for your new Chat Service. Provide the name for example ‘Demo’ and then click ‘Create’.

Copy given below bot webhook and add to both Pre-Event Webhooks and Post-Event Webhooks and select all CALLBACK EVENTS. The callback request is HTTP POST.


Under Push Credentials enable all push notification and click 'save'

Create a user to act as a bot in the Twilio Chat Service:
Submit your service sid, twilio bot username, twilio account sid and token.
Create a general channel in the twilio service.
Now, once the channel is created successfully, the bot is directly added to the Channel by using the data provided.
Verify and Submit your service sid, twilio bot username, twilio account sid and token to publish.
 How to publish a bot on LINE
Go to https://manager.line.biz/
Click Create an account.
Click Sign up with email and enter the required information to create an account.
You are redirected to LINE Official Account Manager webpage. Click on the Create LINE official account button.

Click Create a LINE Official Account.
Enter your company information and submit the application for a LINE business account.

Go to LINE Developers Console.
If not already logged in, click Log in with LINE account to log in.
Enter Your Name and Your Email
Click on the checkbox after referring to the LINE Developers Agreement.
Click the Create my account button.

After creating a LINE developer account, the screen shown below will appear. Click the Create a new provider button.

Enter a provider name and click Create to confirm..
Go to the Providers drop-down list in the sidebar.
Click on the newly created provider and go to the Channels tab.
Click Create a Messaging API channel.

Enter the necessary information and click the Create button.

Click the OK button in the confirmation popup.
Go to the channel you created for the bot.
Go to the Messaging API tab.

Under Webhook settings, click the Edit button in the Webhook URL section.
Enter the Webhook URL given below and click Update.
Scroll down to the LINE Official Account features section and click Edit against any option.
You will be redirected to Response settings on the LINE Official Account Manager website.
Under Main settings, disable Greeting messages.
Under Detailed settings, disable Auto-response and enable Webhooks.

Go to the Basic settings tab.
Scroll down and click Register a public key under the Assertion Signing Key section.
Enter the JSON for the public key given below and click Register.
Note: Once you have generate the public copy and save it for further reference and use the same key to generate KID.

Copy the KID displayed in the popup for later use.
Enter the KID copied earlier and the Channel ID (which can be found under the Basic Settings tab of the LINE channel.
 Publish

Click on ‘Register a bot’ and fill in the details.

Under Configuration - To set ‘Messaging endpoint’ copy the bot callback URL from below field

To get the app ID click on ‘Create Microsoft App ID and password’
Once clicked you will be redirected to “apps.dev.microsoft.com” . Keep a note of the App ID you just received as you will have to submit this app on Gupshup platform

Click on ‘Generate an app password to continue’ to get Password.

Click ‘ok’ and then ‘Finish and go back to Bot Framework’. Finally hit ‘Register’ to create/register your bot on Bot Framework.

 Publish
Click on ‘Register a bot’ and fill in the details.
Under Configuration - To set ‘Messaging endpoint’ copy the bot callback URL from below field
To get the app ID click on ‘Create Microsoft App ID and password’
Once clicked you will be redirected to “apps.dev.microsoft.com” . Keep a note of the App ID you just received as you will have to submit this app on Gupshup platform
Click on ‘Generate an app password to continue’ to get Password.
Click ‘ok’ and then ‘Finish and go back to Bot Framework’. Finally hit ‘Register’ to create/register your bot on Bot Framework.
Once registration is done, add Microsoft Teams from 'Another channels' to 'Channels'

 VKontakte
Once authorized, you will be redirected to a new url which will look this.

 Cisco
Webex Teams
Cisco
Webex Teams
Link for Cisco Webex for Developers https://developer.webex.com/

- Once logged in, you will be redirected to home page, click “Start Building Apps” button
-
On the My Apps page, click “Create a New App” button

-
When clicked on “Create a New App” button, you will be asked to choose a type of app you want to create. Click “Create a Bot” button.

-
You will be redirected to page where you will be asked to fill up the bot details - Bot name, Bot username and description.

-
Once this information are filled - Click “Add Bot” button.

-
When you add a Bot by clicking the button “Add Bot” you will receive a congratulation message along with Bot’s Access token, copy this Token.

 SMS Gupshup

To get configure your bot you can also contact Gupshup team at:
Phone: 022 4200 6799
To help them configure your bot, supply the callback URL mentioned below along with two additional parameter pcode and phno where ‘pcode’ refers To(recipient) number and ‘phno’ refers From(Sender) number(by default Enterprise send phonecode and msisdn as To and From as parameters this should be replaced with given parameter).
You can even raise your concern to our team if you don't have dedicated phone number or enterprise account.
Note: Long-code refers to the dedicated phone number for your bot
 Teamchat

Submit your resgistered email and password of teamchat account.
 Viber
Viber
-
Apply for a Public Account, skip this step if you already have one.
-
Read more about Viber bots
The Application Key (also known as authentication token) is generated upon Public Account(PA) creation and can be viewed by the account's admins in the "edit info" screen of their Public Account.

Submit your resgistered Application Key and Public Account Name of Viber account.
 PubNub
- To create one following [ PubNub Hello WorldTutorial ]
Set PubNub Function publish event as After Publish or Fire
AND
Channel should be gupshup.{{variable}} example: gupshup.demochannel

Your bot URL which will be called using the XHR module
Keysets are managed by PubNub and created by users from their admin portal for a particular app. You can get Publish and Subscribe Key of the Pubnub App which will call your Gupshup bot, go to the Key section of the PubNub admin portal

 jiochat
To create the channel, please follow these steps:
Visit https://pp.jiochat.com

Click on “Signup”. Once prompt enter following :
User: ppuser
Password:X@x@123
Fill in the details to register a channel name
Once your account is approved,log in to the channel dashboard.
Go to Developer Center, situated at bottom left of navigation sidebar.

In Developer Center, under DeveloperID. Keep a note of your AppID and AppSecret this will be required while submitting Credential.
Click on ‘Modify configuration’ to set your webhook. You can get your Webhook URL and token from below
 Google Assistant
 Follow these steps
if you haven’t created google cloud project yet.
Follow these steps
if you haven’t created google cloud project yet.
-
Go to the Google Actions API page and in the Dashboard pop-up, click ‘Create’

-
The New Project dialog box appears. Specify a name in the Project name field. Click Create.
Note:
- The project name doesn't need to be the same as your agent's invocation name.
- Make note of the project ID that is generated for you.
- If you didn't make a note of the auto-generated Project ID, you can find it in the project settings

-
Search for Google Actions API from the Library tab

-
And then click ‘Enable’

- Repeat point 1 and 2 for Google Assistant API
Go to actions console

‘Click on Add/import project’ and select your project. You will be redirected to Google Actions ‘Overview’ page

-
You can either click on ‘Invocation’ from the left navigation bar or click ‘Describe how your Action is invoked’ button from the Overview page to go to the Invocation setup page.

- Fill in the details as applicable and click ‘Save’
-
Once you are done with this steps, you will now Fill out the information requested to submit your app for approval. See Registering and Publishing for more information.
 Smooch


To create new app click on 'Create new app' button and follow the steps.

- Go to settings tab
- Copy App ID
- Under API Keys section click 'Create New API Key'. Your App Key and Secret Key will be generated. Copy this App Key and App Secret.

 Web
Widget
Web
Widget
-
Clicking on the "Go to Web Widget" button below will add the web-widget to your website that connects users instantly to your chatbots. Follow the steps to add a bot to the chat widget.
-
As the new window opens up with a widget, use the "Use Custom settings" checkbox to customize the chat widget UI

-
Once the chat widget is customised, click on the 'Get code' to get the javascript code to be used for your website.

 GIP Widget
Get started with GIP Widget configurations
 Hangout
Chats
Hangout
Chats
- Go to the GCP Console Manage resources page.
- Click Create Project
- In the New Project window that appears, enter a project name and select a billing account as applicable.
- Then click Create.
-
Open your project in the API Console. Search for Hangouts Chat API.

-
Then click on Hangouts Chat API result card. You will be redirected to API enabling section, click on ENABLE button.

-
Select the Configuration tab, you will see a screen like the one shown below.

-
Set Bot URL:
Under “connection settings” section of the configuration page select “Bot URL” option and paste the below callback URL in the text box.
-
Get Verification Token:
Under “Verification token” section of the configuration page you will find alphanumeric characters,

Copy this token as you will have to submit it in the “submit credential” form
-
-
Open your projects in the Credentials console, click ‘Create credentials’ and then choose ‘Service account key’ from the drop down list.

You will then be redirected to the “Create service account key” page - fill in the details asked. Make sure to give the service account the Project Owner role and Key type option checked for JSON. Click Create. You'll see a message that the service account JSON file has been downloaded to your computer. Make a note of the location and name of this file. You will need it while submitting credentials.

 InterBot
Publishing your Bot on the InterBot channel enables it to communicate with other InterBot enabled bots.
When your Bot is InterBot enabled, it can be used to compose new composite bots, just by chaining bots together. To read more about how Bots can be chained together to compose new bots, visit InterBot documentation
To read more about how Interbot works, check out the Get started section.
Note: When you enable your Bot for InterBot, it will appear in your My Bots section on InterBot.
 Google Home
-
Go to the Google Actions API page and in the Dashboard pop-up, click Create a project
-
The New Project dialog box appears. Specify a name in the Project name field. Click Create.
-
Note:
- The project name doesn't need to be the same as your agent's invocation name.
- Make note of the project ID that is generated for you.
- If you didn't make a note of the auto-generated Project ID, you can find it in the project settings
-
Search for Google Actions API from the Library tab.
-
Click the name to open it and click Enable
-
Open the Directory listing tab and fill out the required fields and click Register.

-
Invocation Name: Spell out the phrase that activates your agent the same way users would pronounce it. To make sure you get it right, follow our guide to [choosing a good invocation name](https://developers.google.com/actions/distribute/invocation-and-discovery).
Display Name: Your agent's official, readable name, displayed over the large banner image in white. Use your invocation name as the basis for your display name, without any of the modifications you made to reflect spoken pronunciation. You can also include digits and special characters.
Short description: A brief overview of what your agent can do, shown in the list of agents users can browse through in the Directory. Keep the short description concise, but we recommend that you include enough of a description to give users a clear overview of what your agent does.
Full Description: A complete description of your action. The full description appears on your agent's specific listing, but you still want to keep it short. Descriptions that are too long may make your listing difficult to look through.
Small square logo: A 108x108-pixel logo displayed in your Directory listing and wherever your agent is listed in the Home app. Make sure your logo stands out against both a white background and your banner image. Use the right aspect ratio: Logos that are not 108x108 pixels will be cropped and resized.
Large banner image: A 2208x1242-pixel image that appears at the top of your action's listing in the Directory. Your display name and invocation name appear across the bottom of the image, in white text. Make sure your banner image has a solid background (no transparency). Use the right aspect ratio: Banner images that are not 2208x1242 pixels will be cropped and resized.
Sample Invocations: Add examples of phrases users say to interact with or activate the action. For each invocation phrase, use the following structure: Ok Google, talk to <invocation name>
Note that the "k" in "Ok" and the first letter of your invocation phrase are both lowercase.Privacy Policy, Terms of Service, and Contact Information: Provide a contact email for users who need to reach you, a link to your privacy policy, and a link to your terms of service page (if you have one).
Invocation Name: Spell out the phrase that activates your agent the same way users would pronounce it. To make sure you get it right, follow our guide to [choosing a good invocation
Follow these guidelines:
-
Go to the API.AI console.

-
Set your bot webhook:
-
Click Fulfillment and in the left-hand navigation slide the ‘ENABLED’ toggle to enable webhook

-
Under ‘URL’ Copy paste the url from below.

-
-
Deploy your agent
-
Click Integrations and in the left-hand navigation, click the SETTINGS link on the Actions on Google card.

-
In the Google Project ID field, enter the project ID and click Deploy

-
-
Go to the Google Actions API in the Google API Manager.
-
Open the Deployment history tab.
-
Check the Status column for the deployment status:

 Passthrough
Create your own UI for interacting with the Bot
To configure the webhook for incoming request

Please wait ...
 Google Chat
1. Go to Google Cloud Platform
2. Log in to your Google account if not already done.

3. Click on the Create Project button.
4. Enter the Project Name. (The project name doesn't need to be the same as your bot.)

5. Make note of the Project ID that is generated for you. (If you missed it, you can find the Project ID by clicking on the Project Name displayed in the top left corner.

1. Click the hamburger button in the top left corner to enter the navigation menu.
2. Go to Library in the APIs & Services drop-down list.

3. Search for Google Chat API in the search bar and select the API.
4. Click the Enable button.

Click the hamburger button in the top left corner to enter the navigation menu.
Go to Library in the APIs & Services drop-down list.
Search for Google Chat API in the search bar and select the API.

Click the Manage button.
Select Configuration in the sidebar.
Enter the Bot name and Description for your bot. Copy the bot name for later use.
Enter the Avatar URL, that is, the link to the icon or image which will represent your bot.

Under Functionality, enable both check boxes.
Under Connection settings, select the Bot URL option and enter the Webhook URL copied earlier in the field that appears below the options.
Click Save.

Select Credentials in the sidebar of the Google Chat API, or go to Credentials in the APIs & Services drop-down menu after clicking the hamburger icon in the top left part of the screen.
Click + Create Credentials and select Service account from the drop-down menu.

Enter a display name for the service account and a description. The service account ID is generated automatically.
Click Create and continue and then click Continue twice.

Go to the service account that you just created and go to the Keys tab.
Click Add Key and select Create new key from the drop-down menu.

Select JSON under Key Type and click Create.
A JSON file will be downloaded on your device. Copy the contents of this file for later use.

- Log in to the Gupshup website.
- Go to Dashboard tab > My Bots section.
- Select the button under the Publish column against the bot you wish to publish.
- A list of channels will appear. Click on the Publish button against Hangouts Chat.
- Scroll down and click Submit credentials
- Enter the service account JSON key and bot name copied earlier into the respective fields.
- Click Submit.
Please make sure the following tasks are done!
- Go to https://www.facebook.com/pages/ and log in to your Facebook account.
- Click on the Page you have created for linking to the Instagram account.
- Under "Manage Page", scroll down and select "Settings".
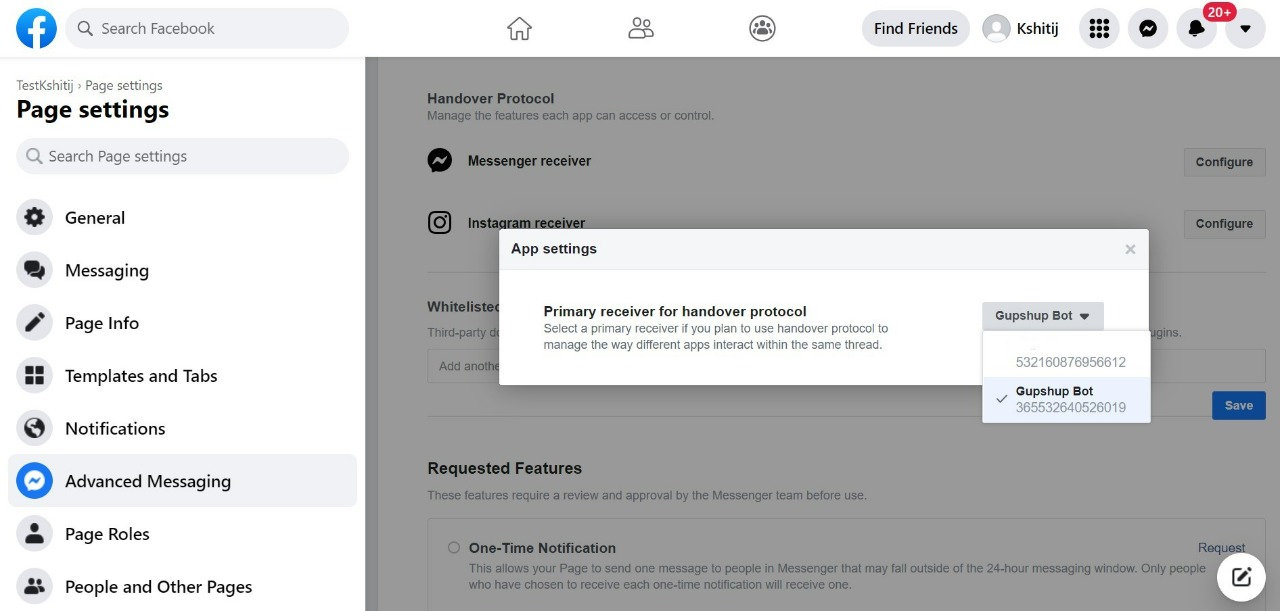
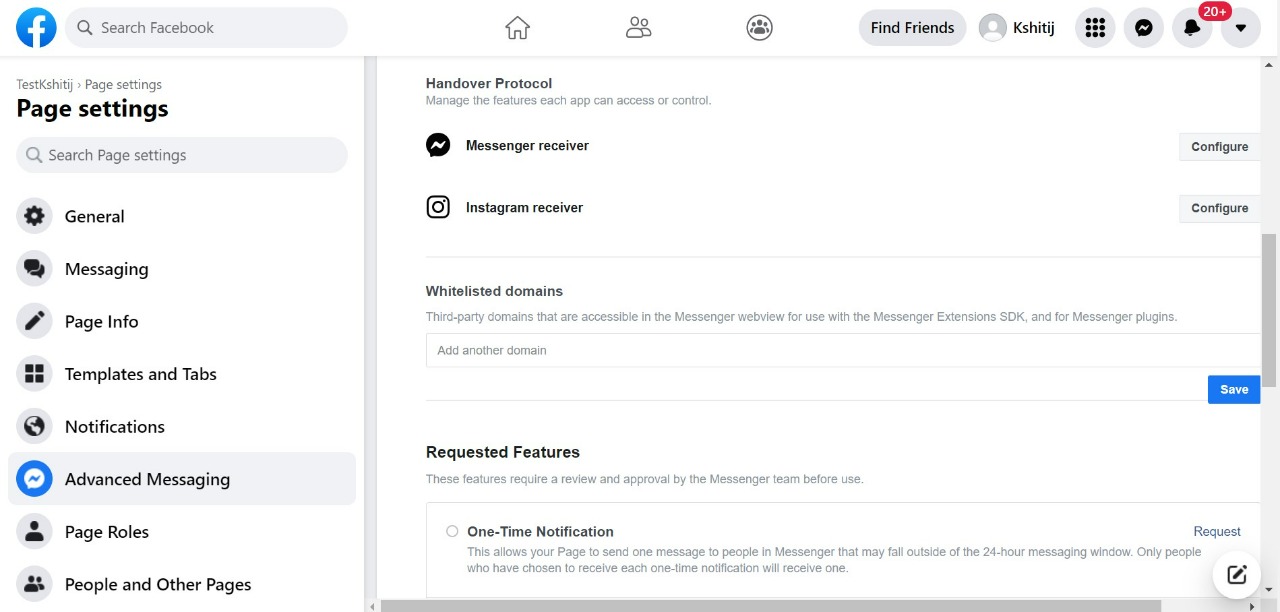
- In the sidebar on the left, select "Advanced Messaging".
- Click the "Configure" button against Instagram receiver in the "Handover Protocol" section.
- From the dropdown menu, select "Gupshup Bot"
- Go to your Instagram Business (Professional) profile page.
- Tap the hamburger icon in the upper right corner.
- Select "Settings" > "Privacy" > "Messages"
- Under "Connected Tools", switch on the "Allow Access to Messages" toggle.
Note: Allowing access to messages is available only through the mobile phone app currently.
Alert!
Please click on "Proceed" to disconnect the previous bot and connect the current bot to your Instagram Business Account.
Alert!
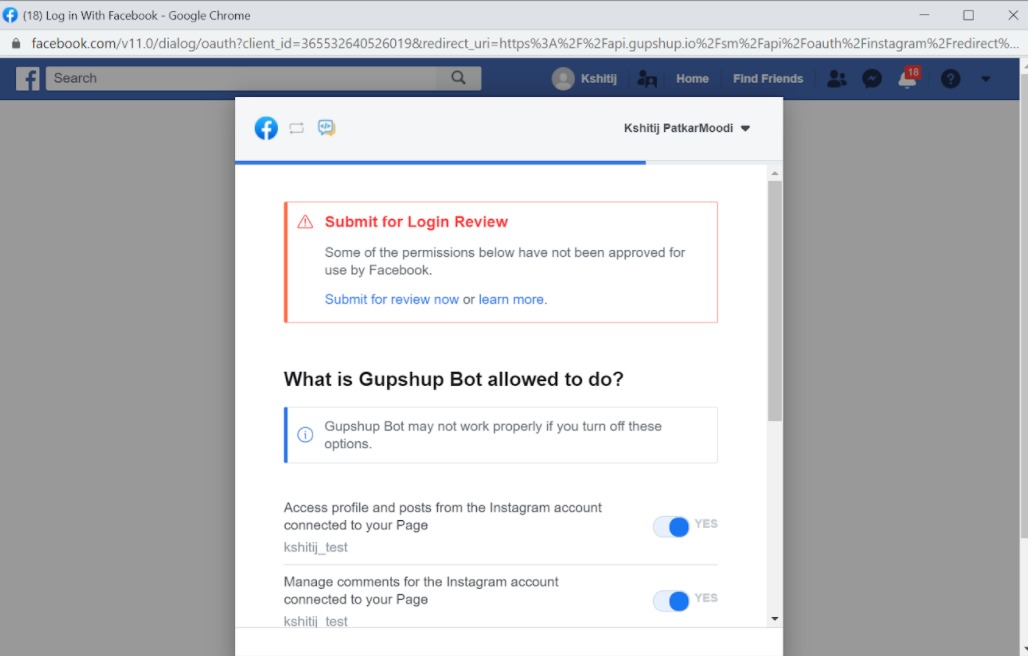
To select all the permissions, please follow the steps given below:
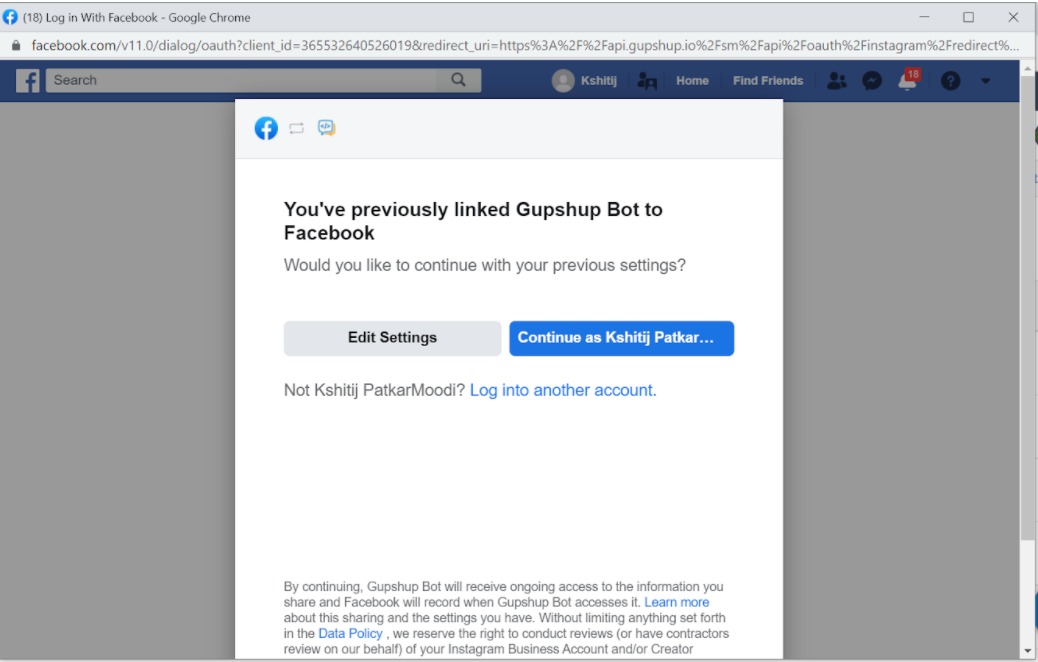
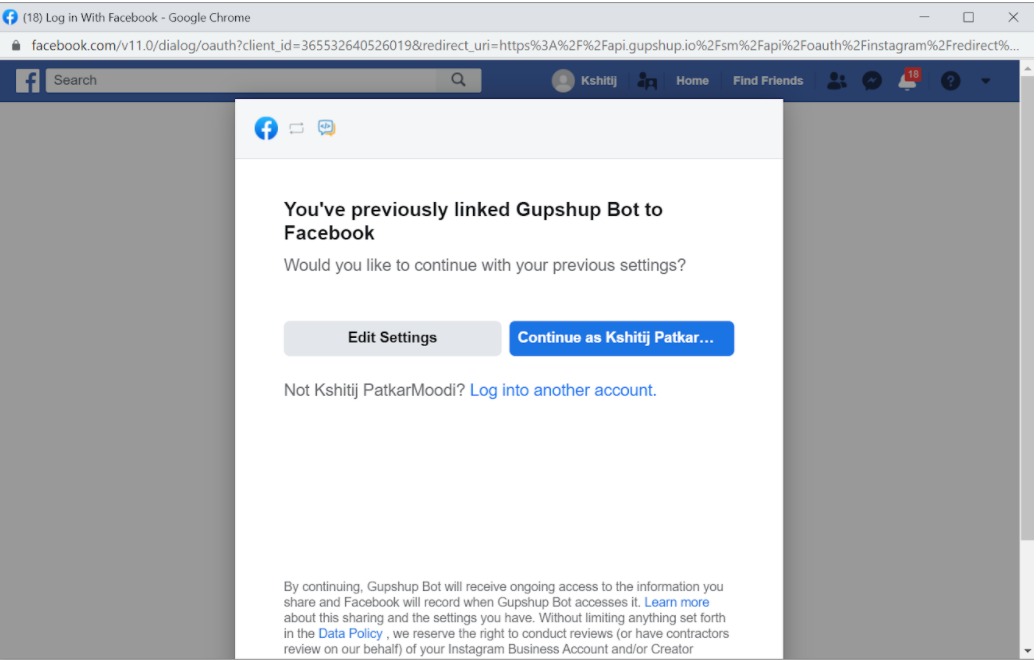
- Click "Publish" against Instagram and click the "Link with Facebook" button.
- A new window will open. Instead of logging into your Facebook account, click the "Edit Settings" button.
-
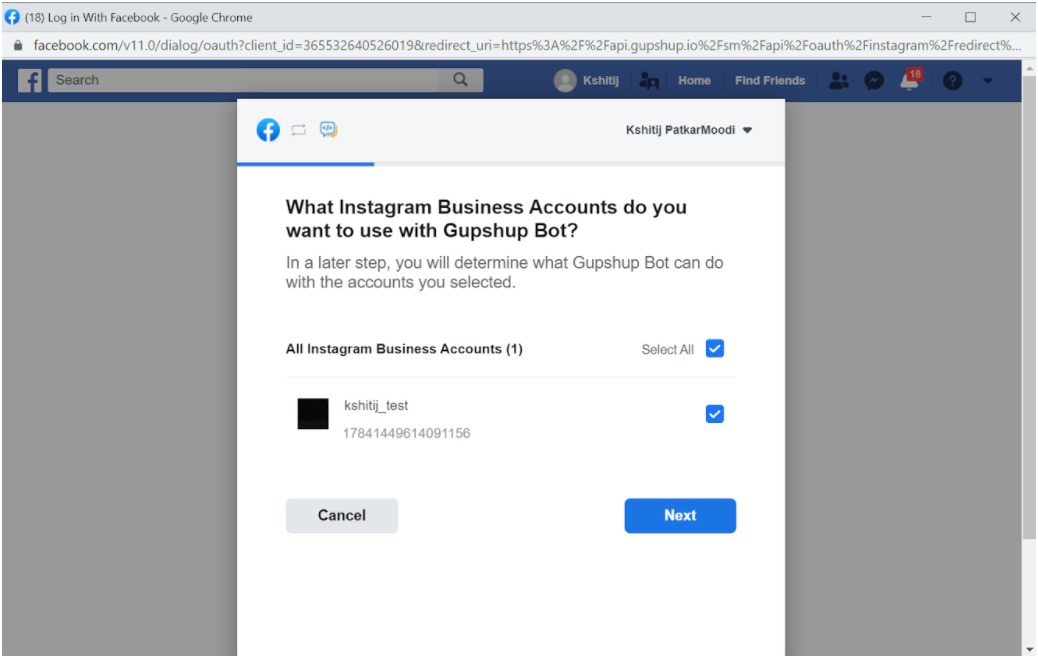
Keep the account and Page selections the same and click "Next" until you reach the permissions page.
-
Switch on all the permission toggles on this page and click "Done".
Alert!
To unselect the additional accounts and pages, please follow the steps given below:
- Click "Publish" against Instagram and click the "Link with Facebook" button.
- A new window will open. Instead of logging into your Facebook account, click the "Edit Settings" button.
Keep the account and Page selections the same and click "Next" until you reach the permissions page.
-
Unselect the additional Instagram Business Accounts and click "Next".
-
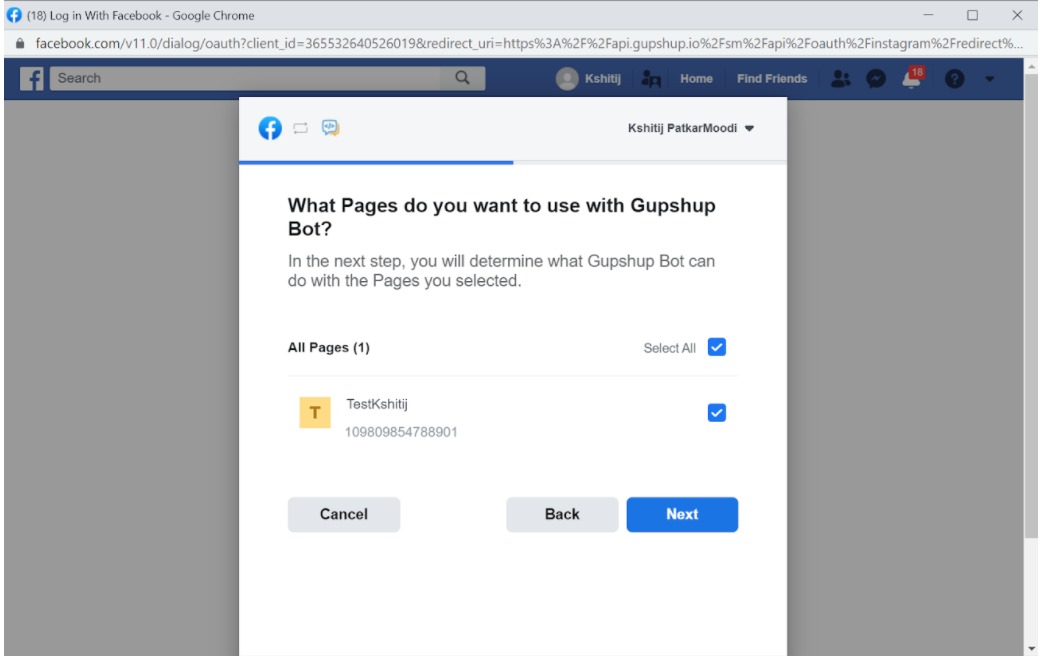
Unselect the additional Facebook Pages and click "Next".
Alert!
Please follow the steps given below for publishing your bot on Instagram.
- Select one Instagram Business Account.
- Select the Facebook Page which is connected to your Instagram Business Account.
- Select all permissions needed for the bot.
Please wait